The JPEG Quality Cliff at 90, and What Actually Changes
Push a JPEG from quality 85 to 89 and the file grows by about 40 KB. Push it one more step, to 90, and it grows by 171 KB. That is not a smooth curve with a steep end — it is a switch being thrown. Something specific changes at 90, it is visible in the file itself, and knowing what it is tells you exactly which side of it you want to be on.
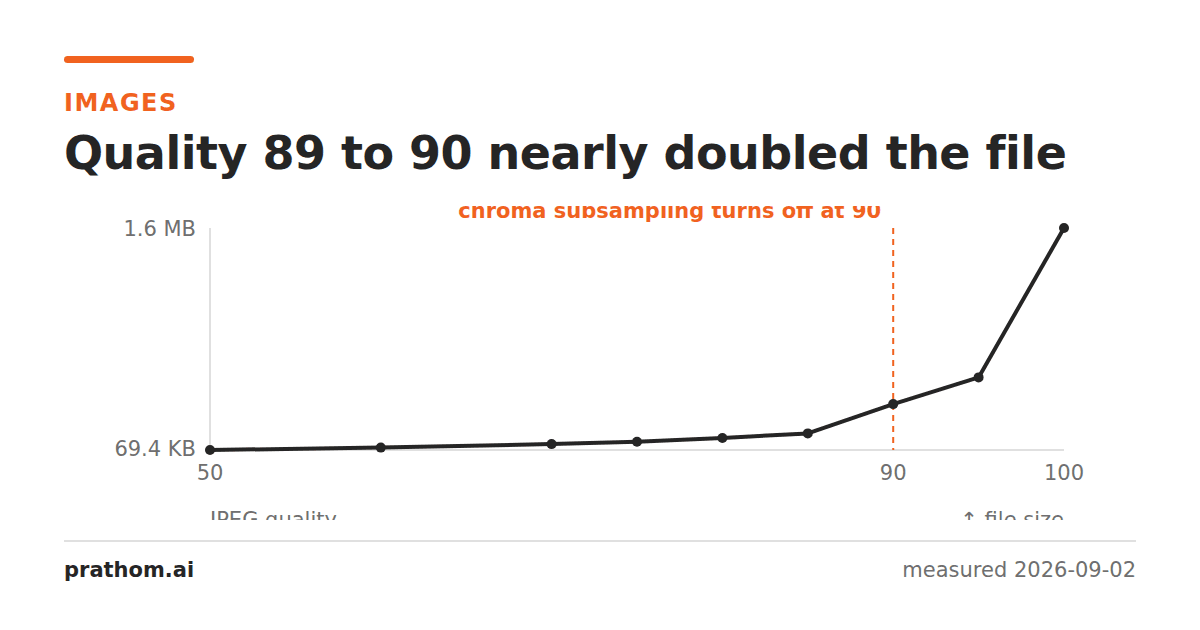
The same 1600×1200 photograph, saved at a range of quality settings:
| quality | file size | PSNR | cost of the last step |
|---|---|---|---|
| 75 | 131,524 B | 39.27 dB | |
| 80 | 158,774 B | 39.85 dB | +27 KB for +0.58 dB |
| 85 | 191,963 B | 40.49 dB | +33 KB for +0.64 dB |
| 89 | 234,324 B | 41.11 dB | +42 KB for +0.62 dB |
| 90 | 405,276 B | 44.74 dB | +171 KB for +3.63 dB |
| 95 | 599,532 B | 46.74 dB | +194 KB for +2.00 dB |
Every step up to 89 buys about 0.6 dB for 30–40 KB. The step to 90 buys 3.6 dB for 171 KB. That is not the encoder trying harder. That is a different mode.
What flips
JPEG stores brightness and color separately, and it is allowed to store color at lower resolution than brightness — because human vision is far more sensitive to brightness detail than to color detail. Storing one color sample for every 2×2 block of pixels is called 4:2:0 chroma subsampling, and it throws away three quarters of the color information before compression even starts.
Reading the sampling factor straight out of each file shows the switch:
| quality | sampling factor | meaning |
|---|---|---|
| 85 | 2x2,1x1,1x1 | 4:2:0 — color at quarter resolution |
| 89 | 2x2,1x1,1x1 | 4:2:0 |
| 90 | 1x1,1x1,1x1 | 4:4:4 — full color resolution |
| 95 | 1x1,1x1,1x1 | 4:4:4 |
libjpeg turns subsampling off at quality 90. You are not paying for finer quantization at that step; you are paying to store three times as much color data.
Whether you want it
Forcing the sampling factor by hand, at a fixed quality of 80, separates the two effects:
| image | 4:2:0 | 4:2:2 | 4:4:4 |
|---|---|---|---|
| photograph | 158,774 B (39.85 dB) | 192,529 B (41.10 dB) | 251,208 B (42.59 dB) |
| flat graphic | 22,502 B (38.47 dB) | 28,025 B (41.12 dB) | 37,390 B (48.77 dB) |
| page of text | 247,092 B (39.68 dB) | 247,092 B (39.68 dB) | 247,092 B (39.68 dB) |
Three separate lessons in one table.
On a photograph, subsampling is close to free. Full color costs 58% more bytes for 2.7 dB, most of which you will not see on a screen. This is why it is the default and why it has been the default for thirty years.
On flat color, subsampling is expensive. The graphic gains 10.3 dB from
full color — a visible difference, not a statistical one. Saturated flat areas next
to each other are exactly where quarter-resolution color produces smeared,
bleeding edges. If you are stuck saving a logo or a chart as JPEG, 4:4:4is the
setting that stops it looking dirty.
On grayscale, it does nothing at all. The text page is identical to the byte at all three settings, because a grayscale image has no color channels to subsample. If you are compressing scans of documents, this whole discussion is irrelevant to you — and any advice that tells you to raise quality to 90 "for sharper text" is selling you 100 KB for nothing.
What to actually pick
- Photographs for the web: 75–85. You are on the flat part of the curve, where each step costs little and buys little. 80 is a reasonable default and 85 is a reasonable maximum.
- Never 90 by accident. If you find yourself typing 90 because it "feels safe", you have chosen to store full-resolution color. Choose it deliberately or drop to 85 and keep the 171 KB.
- Flat color or text: do not use JPEG at all — it is bigger than PNG on that content, not just worse. If you must, set 4:4:4 explicitly.
- Above 95 the curve turns vertical. Quality 100 was 1,687,124 B — 88% of the original PNG, for a file that is still lossy.
Repeating it
magick photo.png -quality 89 a.jpg
magick photo.png -quality 90 b.jpg
magick identify -format "%f %[jpeg:sampling-factor]\n" a.jpg b.jpg
ls -l a.jpg b.jpg
The exact quality at which your encoder flips can differ — it is a libjpeg convention, not part of the JPEG standard — which is the strongest reason to read the sampling factor out of the file rather than trust a number.
What PSNR does and does not tell you
Every quality number above is PSNR — peak signal-to-noise ratio, a measure of how far each pixel moved from the original. It is the honest thing to publish because it is reproducible: run the same commands and you get the same number. It is also a poor model of human vision, and it is worth saying so rather than letting the decimal places imply more precision than they carry.
PSNR treats every pixel equally. Human vision does not. A one-unit error spread evenly across a smooth sky is far more visible than the same error hidden in foliage, and PSNR scores them identically. This matters for reading the table above: the 2.7 dB the photograph gains from full color is smaller than it looks, because much of it lands in areas the eye is not examining, while the 10.3 dB the flat graphic gains lands exactly where you are looking — on the boundary between two solid colors.
So use the sizes as measurements and the quality numbers as a direction of travel. Where the two disagree with your eyes, your eyes are the ones being served.
Why the cliff is not in the standard
Nothing in the JPEG specification says quality 90 means full-resolution color. The quality slider itself is not in the standard either. What the format stores is a quantization table — a grid of divisors applied to the frequency coefficients — and "quality 80" is just a convention for scaling a reference table by a certain amount. libjpeg's authors chose both the scaling and the point at which subsampling switches off.
That has a practical consequence. Different encoders make different choices, so a file saved at "quality 90" by one program is not the same file another program would produce at 90, and re-saving at the same number does not mean re-saving with the same settings. It is also why reading the sampling factor out of the file is more reliable than reasoning about the number you typed — the file records what was actually done, and the number records only what you asked for.